
Salesforce has expanded the capabilities of the Send Email Action in Flow Builder, significantly increasing its efficiency and flexibility. Previously, the action allowed for only a limited number of recipients, but now the limit for total email addresses has been increased from 5 to 150. This enhancement is a game-changer for teams that rely on automation for communication with larger groups.
Additionally, Salesforce has introduced the ability to include CC and BCC recipients in the Send Email Action, enabling users to tailor their email communications with greater precision.
Why This Matters
Previously, you could only email 5 recipients at a time through Send Email Action in Flow Builder. This was fine for small groups but frustrating for larger ones. Now, with a limit of 150 email addresses, you can reach bigger audiences in a single step.
But that’s not all. By introducing CC and BCC, Salesforce gives you more control over how you communicate:
- CC (Carbon Copy): Perfect for keeping key people in the loop.
- BCC (Blind Carbon Copy): Ideal for protecting privacy when emailing multiple recipients.
These changes make it easier than ever to use Salesforce as a communication hub for your team, customers, or partners.
How Do CC and BCC Work?
CC (Carbon Copy)
When you add someone to the CC field, they’ll receive a copy of the email, just like the primary recipients. It’s great for making sure colleagues, managers, or external stakeholders stay informed without being directly addressed.
BCC (Blind Carbon Copy)
Anyone added to the BCC field will also get the email, but their addresses won’t be visible to anyone else. This is incredibly helpful for maintaining confidentiality or avoiding awkward “reply all” situations.
How to Use the New Features in Flow Builder
Excited to try it out? Here’s how you can make it work:
- Open Flow Builder:
- Add a new action to your flow by clicking the element menu.
- Search for and select Send Email.
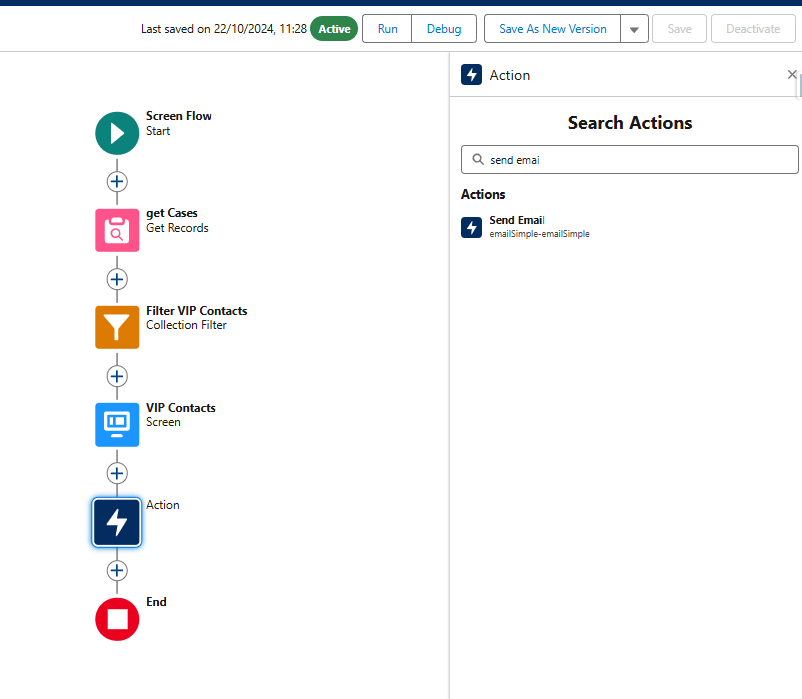
- Enable CC and BCC:
- In the input fields, you’ll see options for CC Recipient Address List and BCC Recipient Address List.
- Toggle them on.

- Add Your Recipients:
- You can add email addresses in two ways:
- Type them as a comma-separated list (e.g., team@example.com, support@example.com).
- Use a field to dynamically pull in email addresses based on your Salesforce records.
- You can add email addresses in two ways:
Real-Life Ways to Use This Update
1. Notify a Large Group
Let’s say you’re announcing a product update or sending reminders to customers. With the new 150-recipient limit, you can reach your entire audience without splitting the list or creating multiple emails.
2. Keep Your Team in the Loop
Need to notify clients while keeping your team informed? Add team members to the CC field. That way, they’ll see what’s been sent without needing separate communication.
3. Protect Privacy
Maybe you’re working with sensitive customer data or external contacts who shouldn’t see each other’s email addresses. The BCC field ensures you can send messages without exposing everyone’s information.
4. Personalize with Dynamic Lists
Want to send tailored emails to specific groups? Use merge fields to pull in dynamic recipient lists based on criteria like region, role, or status. It’s automation at its best!
What Makes This Update a Game-Changer?
- More Reach: Communicate with larger groups in one go.
- Improved Privacy: Use BCC to protect email addresses.
- Efficiency Boost: No more juggling multiple email actions or workflows.
- Scalable Automation: Perfect for growing teams, expanding campaigns, or complex notifications.
Tips for Getting Started
If this is your first time using the updated Send Email Action, here are a few things to keep in mind:
- Test Before You Launch: Always send a test email to make sure your CC and BCC settings are working as expected.
- Be Mindful of Limits: While 150 recipients is a big improvement, you’ll still need to consider Salesforce’s daily email limits.
- Use Dynamic Data: If your flow includes merge fields, double-check your data to avoid errors or blank fields.
COMMENTS:

Leave a comment