
Upsert is a commonly used feature when building Classes and Triggers in Apex, but for a long time, this functionality was missing in Flows. This was a problem because Upsert offers several advantages, such as:
- Simplified automation: You can use two functions together instead of creating separate Update and Insert actions.
- Ease of maintenance: There’s no need to alter the logic for checking the existence of records if the data structure or system requirements change. This makes the process more flexible and less prone to errors.
- Efficiency in transactions: Using Upsert helps reduce the number of DML calls within a transaction, which is crucial for staying within Salesforce’s limits. This allows you to insert or update many records simultaneously in an efficient manner.
Although Flows don’t have an Upsert function, there is a similar feature that can save time and significantly improve the quality of the project by allowing you to check for similar records before creating a new one.
What can be done with the “Check for Matching Records” functionality?
Basically, you can use this feature to check one record at a time. For example, if you’re creating a contact using a Screen Flow on the Account page and want to check if there is already a contact with the same email associated with that account, this is entirely possible with this functionality, and I’ll show you how!
Step 1 – Creating the Flow
In this example, we will create a Screen Flow, but you could also use a Record-Triggered Flow.
The concept is the same; the difference lies in what triggers the creation of the record.
Follow these steps:
- Go to Setup;
- Search for “Flow” in the Quick Find box;
- Click on “New Flow”;
- Select “Start From Scratch” and then choose “Screen Flow”;
- Add a “Screen” element and include the necessary components;
In this case, I used the following components:
- First Name (Text);
- Last Name (Text);
- Email (Email).

Step 2 – Adding the “Create Records” Element
This is the most important part of the process. As mentioned earlier, no matter what type of Flow you choose, simply add the Create Records element to the Flow and enable the “Check for Matching Records” function to make it work.
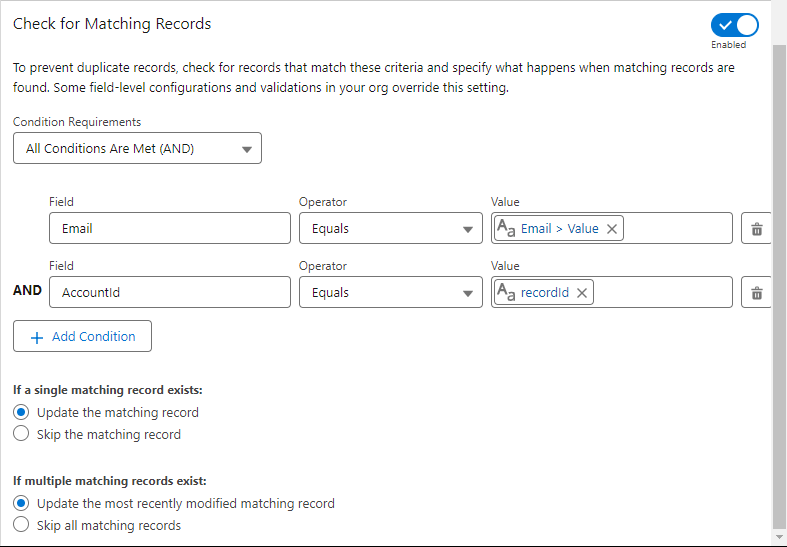
To check for records already created in Salesforce, you need to check the “Enabled” box next to “Check for Matching Records.” After that, you’ll have some configuration options.
First, select the fields that will be checked for duplicate records, such as an email, for example. If a contact record has the same email as an existing contact in Salesforce, a new record will not be created; instead, the existing one will be updated.
Another interesting option is that you don’t necessarily need to update the record. If you just want to check for an existing record without taking any action, select “If a single matching record exists: Skip the matching record” and “If multiple matching records exist: Skip all matching records.”
Follow these steps:
- Click on “Add Element” and choose a “Create Records” element;
- Select the options;
- How to set record field values: Manually;
- Object: Contact;
- Set field values for the contact:
- I selected the fields AccountId, Email, FirstName, and LastName and mapped them to the values from the Screen Flow components.
- Click on “Enabled” next to “Check for Matching Records”;
- In the condition requirements, include the fields:
- Email equals Email (Component from the screen);
- AccountId equals recordId (Variable that contains the ID from the account record).
- Check the options:
- “Update the matching record”;
- “Update the most recently modified matching record”;
- Save and activate the Flow.

Step 3 – Testing the Flow
First, we’ll add the Flow to the Account record page and then test it.
- Go to the page of an Account record;
- Click on the gear icon at the top of the page;
- Click on “Edit Page”;
- Add the “Flow” component to the page;
- In the component’s configuration, select the Screen Flow that you just created;
- Check the box “Pass record Id into this variable”;
- Click “Save”.
Now we need to test our Flow and see if everything works!
First, go to an Account record. Using the Screen Flow we just created, try to create a record with the same email as an existing contact. You’ll see that it updates the contact’s name without creating a new contact!

COMMENTS:

Leave a comment