
Deleting fields is not always the best option. Often, fields are used in some automation like Triggers or Flows, or even in reports and report types. In these cases, the option to delete can end up causing problems and interfering with an existing process.
However, it may be that due to object limits, you can no longer create fields in an object. For this reason, deleting a field may be something we have to do at some point.
The process of deleting is not difficult, but we need to pay attention to some crucial points. Besides, it is important to do a preliminary analysis of how the field is used by the org and whether this will cause a negative impact or not.
With that in mind, follow the steps below if you really need to delete a field:
Step 1 – Analyze if the field is used
First, we need to analyze if the field is used in any trigger, flow, layout, lightning page, etc. If it is being used, we need to remove it before deleting. If this is not done, it can end up impacting some important process that is using the data contained in the field, and we don’t want that to happen.
To do this, follow these steps:
1. Click on Setup;
2. Go to Object Manager;
3. Click on the object where the field is located;
4. Click on Fields and Relationships;
5. Go to the field you want to delete;
6. Click on “Where is thid used?” and see where it is being used.

Step 2 – Consult the Stakeholders
Before deleting a field, it is essential to consult the relevant stakeholders. This includes project managers, Salesforce administrators, and any other users who might be impacted by the removal of the field. Consulting with stakeholders helps ensure that all implications of deleting the field are understood and that there are no unforeseen negative impacts.
Step 3 – Data Backup
Another very important step is to back up the data. When we delete a field, we are also deleting all the data it contains. To avoid future problems, it is always important to have the data saved somewhere external to Salesforce for future reference if necessary.
Some tools I usually use for this are:
– Salesforce Reports;
– Salesforce Inspector;
– Data Loader.
Step 4 – Delete
Finally, it’s time to delete. We went through the previous steps and are confident that this is the best approach. What should I do?
Just go to the field and click the “delete” button.

If there is no error, the field will be deleted. But it’s not over yet, as the field remains in the org for 15 days until Salesforce performs the hard delete. These fields that have not yet been hard deleted still count towards the custom field allocation for your org. So, if the custom field allocation for this object is full, you still cannot create new fields.
Step 5 – Purge Deleted Custom Fields
And if I need this now, is there any way to change this default Salesforce time? The answer is: Yes!
To get more space in your org’s field allocation, you need to manually hard delete these fields.
If you are over 75% of your custom field allocation, Salesforce provides a Purge button. This button is located in the Fields & Relationships tab. To do this, follow these steps:
1. Click on Setup;
2. Go to Object Manager;
3. Click on the object where the field is located;
4. Click on Fields and Relationships;
5. Click on “Deleted Fields”;
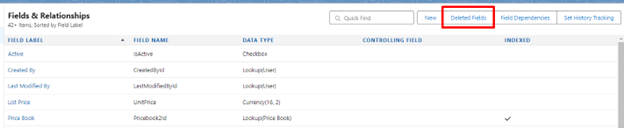
6. Click on “Erase” for the field that you want to delete.

After doing this, the fields will be permanently deleted and there is no way to undo it.
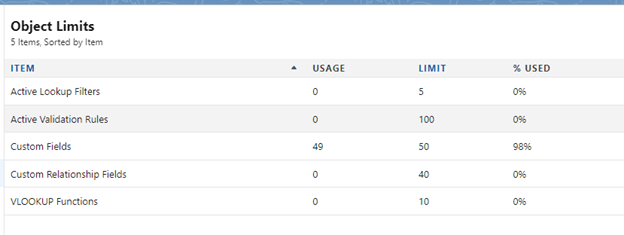
Step 6 – Check Object Limits
Now we can check if it worked. Go to “Object Limits” > Custom Fields and see if the custom field allocation is less than 100%.
COMMENTS:

Leave a comment