
When we create a screen flow using list view buttons and test it for the first time, it usually returns to the first page and executes the flow again until the page is closed by the user.
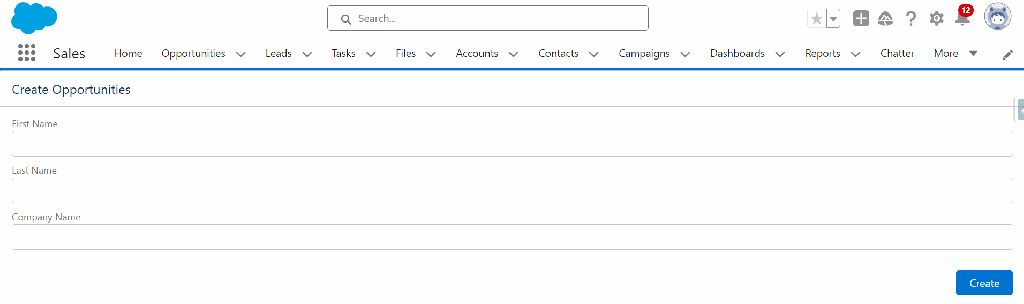
This behavior may lead to the following issues:
- Confusion leading to reduced productivity when not returned to the original page
- Data inconsistency from repeated screen flows creating new records
- Increased support needs due to confusion post-flow execution
- Various usability and system efficiency issues
To avoid these issues, it is crucial to ensure that flows are well planned and tested, including the redirection behavior after completion. This will help provide a smoother and more efficient user experience, increasing confidence and satisfaction with the system.
Follow these steps to redirect your flow back to the list view:
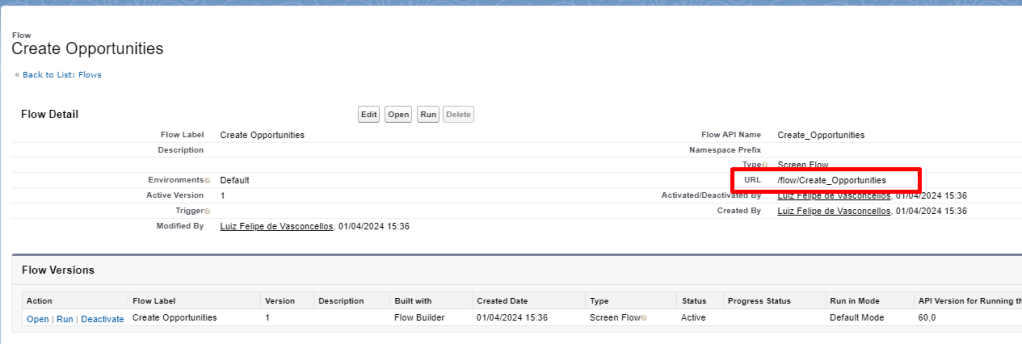
STEP 1: Find Your URLs
Screen Flow URL:
Assuming that your screen flow is already created and tested.
- Go to Setup and find your flow:
- In the quick find box, type “Flow”;
- Find your flow and click the down arrow on the left corner;
- Click on “View Details and Versions”;
- Copy and save the value found in the “URL” field.
List View URL:
Go to the page of your object and copy the URL; we will use it in the next step.

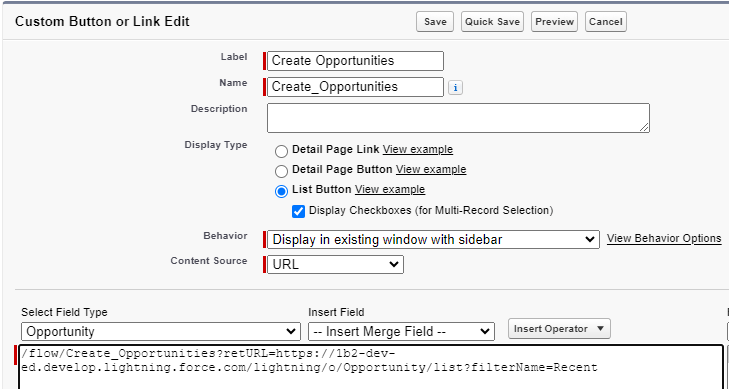
STEP 2: Create the Button
Now it’s time to create the button. To do this, follow these steps:
- Access Setup;
- Go to “Object Manager” and select the object where the button will be added;
- Click on “Buttons, Links, and Actions”;
- Click on “New Button or Link”;
- Fill in the fields:
- “Label”, “Name”, and “Description”;
- Display Type: List Button;
- Behavior: Display in existing window with sidebar;
- Content Source: URL;
- Paste the flow URL and the list view URL in the following format:
FlowURL+?retURL=+ListViewURL
- Click “Save”.
Note: It's important to mention that if you are deploying from a sandbox to a production environment and wish to avoid hardcoding, you can use a system variable or a custom label to store the URL. However, even when using a custom label, you will need to change it to the original URL in the production environment.
The system variable would be like this:

/flow/Create_Opportunities?retURL={!LEFT($Api.Partner_Server_URL_260, FIND('.com', $Api.Partner_Server_URL_260)+4)}TEXT(/lightning/o/Opportunity/list?)
STEP 3: Add the Button to the List View Layout
Finally, it’s necessary to make the button available in the list view:
- Return to Setup;
- Click on “Object Manager”;
- Select the object where the button was created;
- Click on “Search Layouts for Salesforce Classic”;
- Find “List View” and click “Edit”;
- In the “Custom Buttons” section, move the created button to the “Selected Buttons” box;
- Click “Save”.

STEP 4: Test your flow and see the magic happen

COMMENTS:

Leave a comment